
How I Built a Home VO Setup for $100 That Worked Great and Was Only Mildly Uncomfortable
TL;DR: How I Built My Home VO Setup
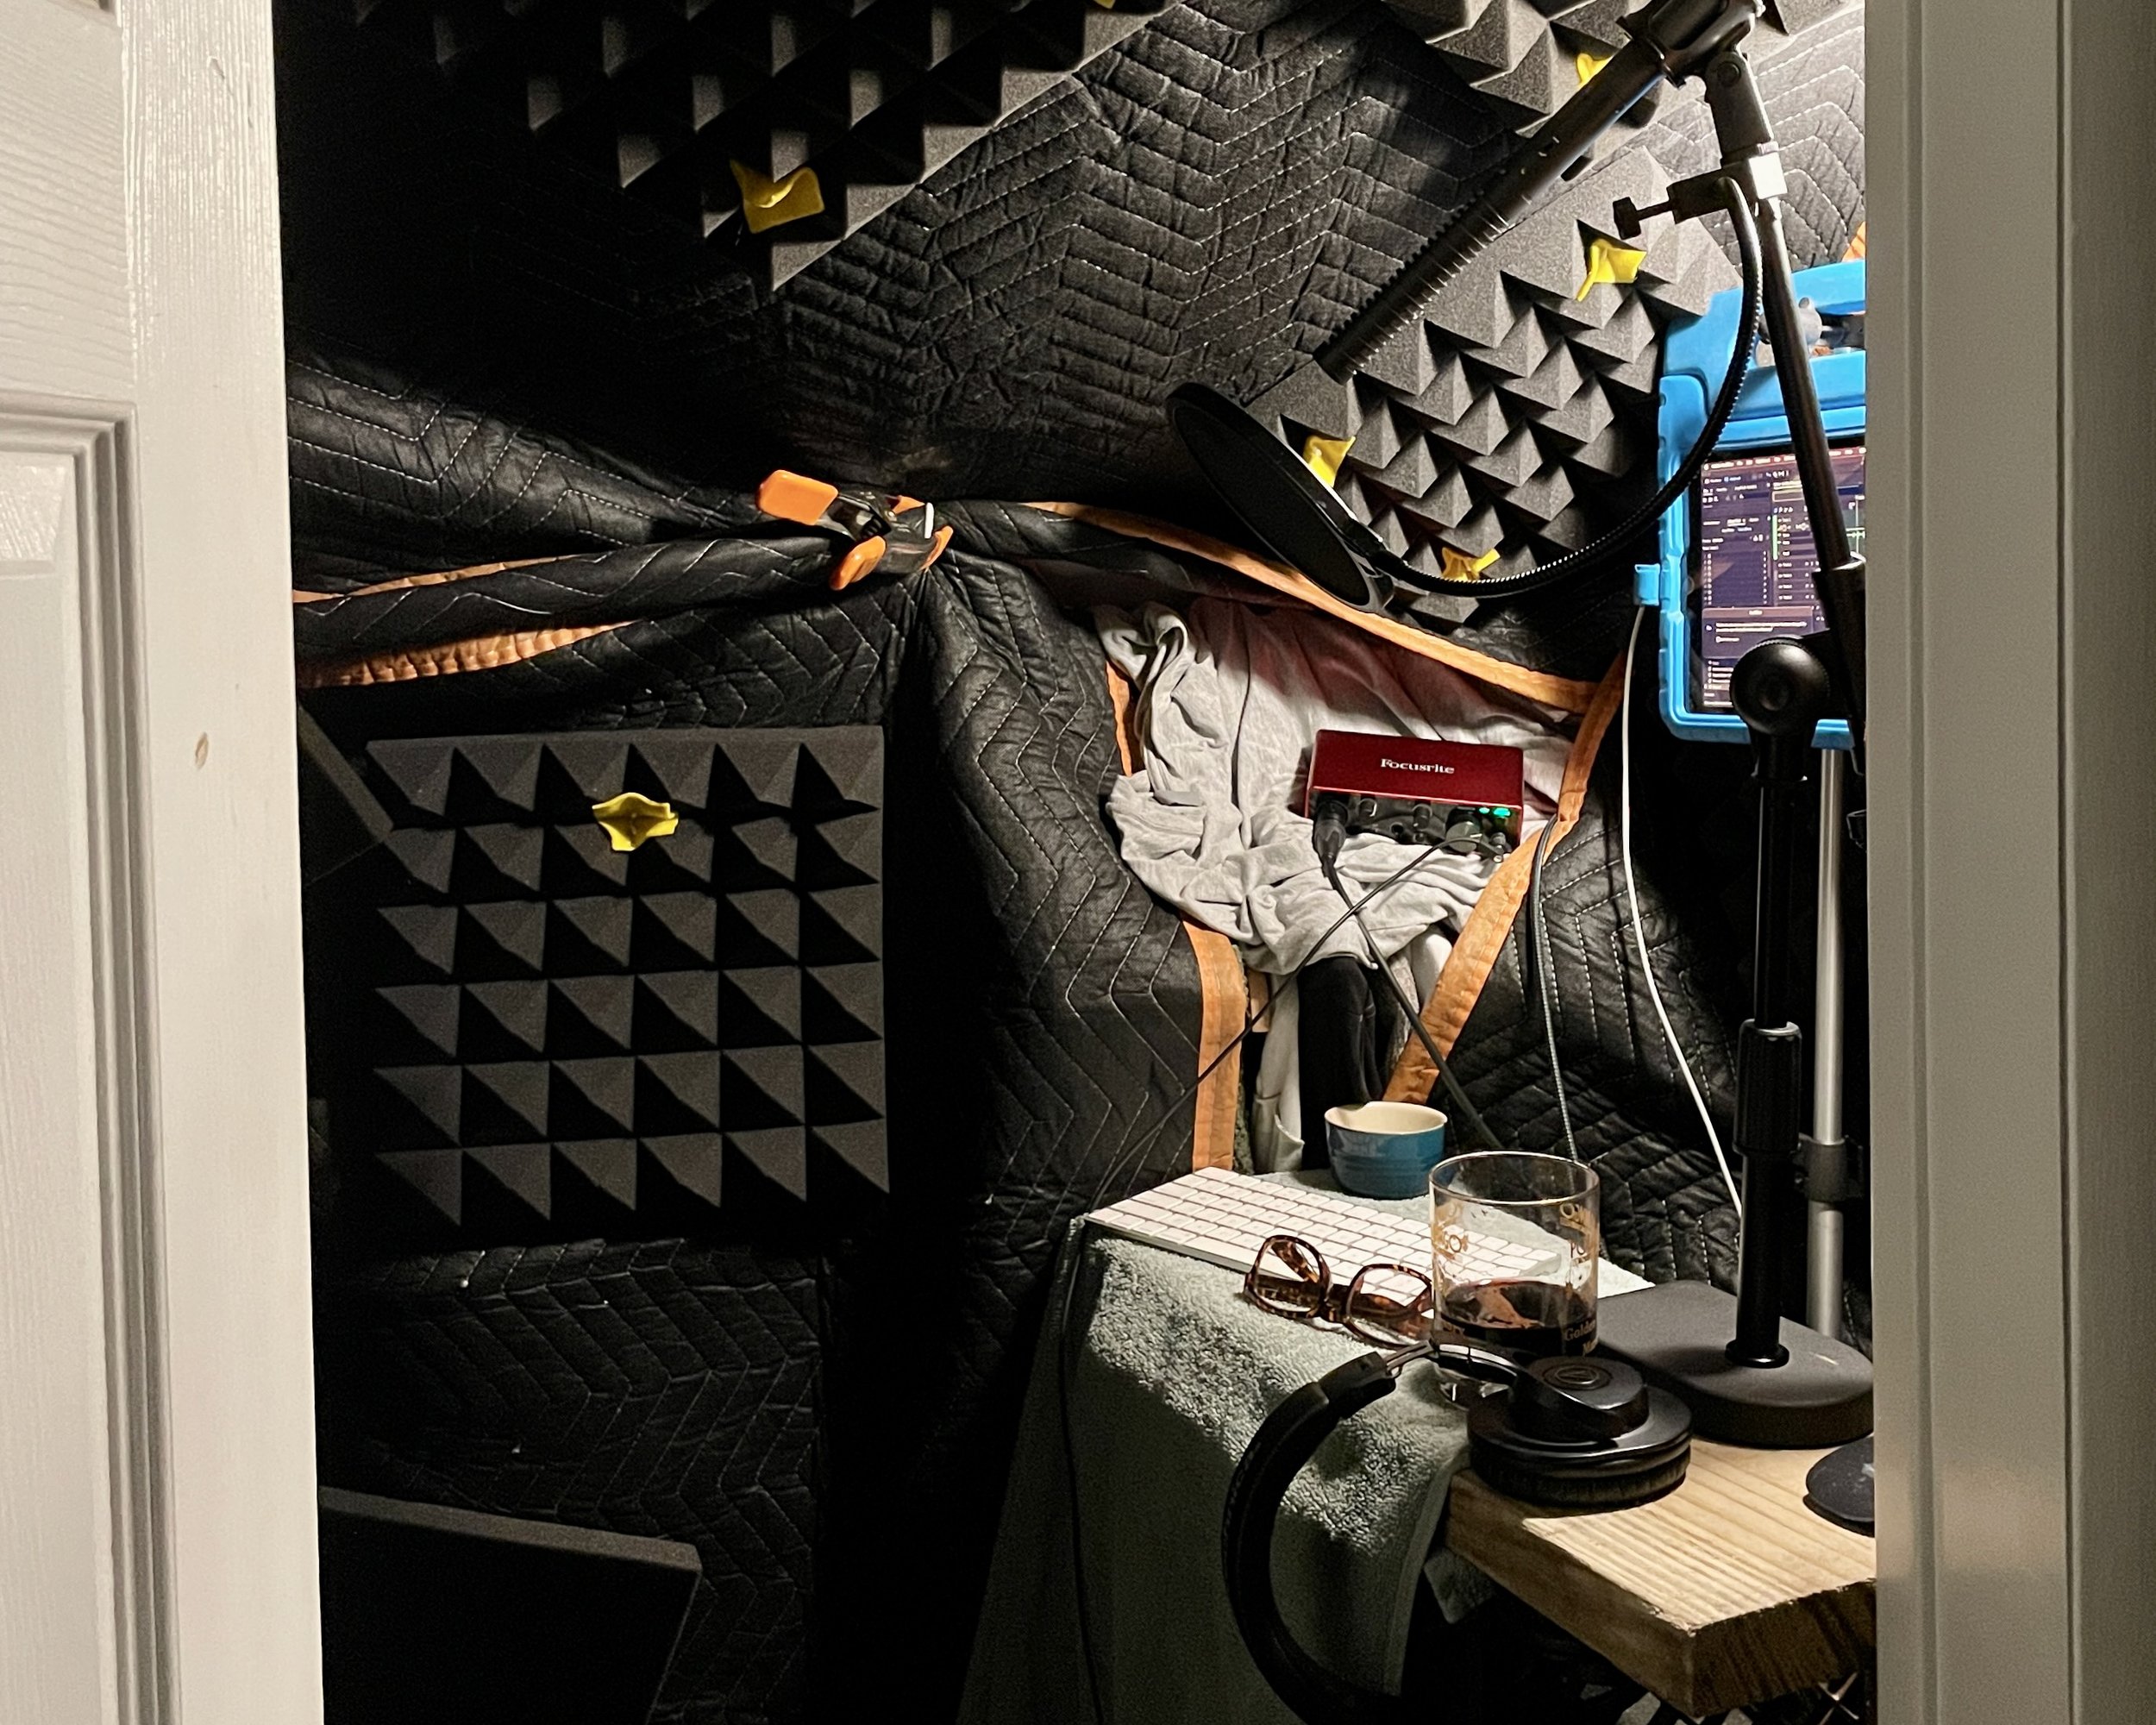
Space: Treated a tiny closet with moving blankets, foam, and clothing for natural absorption
Budget: Spent ~$100 on materials (blankets, foam, hardware)
Gear Kept Outside the Booth: Laptop + noisy electronics
Recording Chain: RØDE NTG2 → Scarlett Solo → Reaper/Audition
Sound Quality: Clean, echo-free recordings; not soundproof, but broadcast-quality
Comfort Level: Mildly uncomfortable (tight space, low ceiling), but highly effective
Ideal For: Voice actors building a budget-friendly home recording booth in a small space
*full disclosure: This booth is no longer in service, I’ve since moved into a proper, professionally-built permanent booth, which I’ll write up in a separate post.
The First Booth. While I’m proud of what the booth was able to provide, I’m very glad to have upgraded to a more legit, custom build.
Back when I made the decision to take my voiceover pipe dream and move it into reality, of course I started reading and watching tons of content related to creating a home voiceover setup.
And if you’ve researched “how to build a home VO booth,” you’ve probably noticed the same thing I did:
You can spend thousands on high-end voiceover gear, but if your home recording space doesn’t have real sound treatment, you’ll still sound like garbage — even if you dropped $1,000 on a mic.
I saw that pro tip literally everywhere I looked, and it got my gears turning on how I was going to build a functional, treated, low-budget home recording booth that also doesn't disrupt the people I live with.
The Previous Recording Setup (aka: Why is My House So Loud)
I'm also a producer, and I've recorded scratch VO for years in a tiny basement space but it had nearly zero sound treatment. And because my house is 120 years old, the “ceiling” of that space (the floor above me) creaked if you breathed anywhere in the building.
You can literally hear someone about to take a step before the step happens.
That was fine for scratch tracks, but once I started recording for final voiceover projects, I knew I needed an upgrade.
Why I Chose the Closet (Even Though It Hated Me Back)
I considered building a freestanding DIY vocal booth or commandeering a corner of another room, but I didn’t want a permanent intrusion on family life. So I picked the one spot that met all my criteria… while offering almost no comfort:
The outside corner of a tiny closet with a pitched ceiling and a hollow-core bi-fold door.
I tested it out immediately—just a “baseline” check. I’ve blasted into other grand ideas that turn into weekend-long time wasters that ended right where I started. So I wanted to check what already might be working.
Surprisingly? It didn’t sound too bad. I could tell it was an improvement on the previous space but I needed to dial down the echo and reduce some ambient noise before this could become a real home recording booth.
The Closet’s Strengths
No exterior walls.
This was converted attic space with a kneewall.
Pitched ceiling.
Acted as both a wall and a ceiling, and made it easier to hang stuff.
Already full of clothes.
The material and mass of the clothes absorb a lot of sound.
Resist the urge to empty out a closet and just slap foam panels on bare walls. The clothes are doing a ton of heavy lifting. Keep ‘em in there.
The Closet’s Weaknesses
Already full of clothes.
This was my partner’s closet and already way too small for their needs. I needed to be able to convert it back to a useable closet when I wasn’t recording.
Pitched ceiling is actually the roof!
The city squirrels use my roof as a highway between their nest and the alley where they feast. I could literally hear them galloping like tiny horses.
Hollow-core bifold door.
Just a visual barrier. Only stops one thing: you, from having to look at your cluttered closet.
Sound happily passes right through, unhindered.
Too short for my height.
I’m tall and unless I stood with my back against the door, I had to tilt my head to be in there.
But whatever, right?! I was determined to make it work. The faster I solved the booth, the faster I could start recording.
My Plan for Building a DIY Home Voiceover Booth
Cover the walls with thick, dense material for sound absorption
Add foam panels as a secondary layer for reflections
Make fabric “doors” for both sides of the bifold door to make up for it being hollow.
Create a blanket-mounting system for fast setup/teardown for when the booth needed to snap back into house-mode.
How I Sound-Treated the Closet
What I Bought (Low Budget, High Impact)
Moving blankets. (~$40)
Just be sure they’re not regular blankets. True moving blankets will be heavy, and sort of quilted as they need to hold a lot of additional material inside.
Foam panels (~$25)
Need to be aired out for a full day or so to fully expand from being compressed for shipping. Don’t install yours right away, thinking that they’ll do their expanding while installed; I had a separate project later on where I learned this the hard way.
Grommet kit (~$15)
Let me put hanging points exactly where I needed.
Drywall anchors + cup hooks (~$10)
These were the only semi-permanent installs.
USB extension cables (~$25 each)
More on this in the “gear outside the booth” section.
Installing the Treatment
I measured the walls and pitched ceiling, then sketched the layout on paper. Each wall/ceiling face would be labeled and get its own blanket, perfectly sized.
Then I cut the stock blankets to size and taped up the rough edges. Some blankets were easily cut down from one blanket, others needed two cut shapes taped together. I used gaffer’s tape which I had on hand, but any decent quality duct tape would work too. Then labeled the blankets using the sketch info.
Next I:
Added grommets to the newly sized blankets
Attached foam panels (I recco heavy twist ties or picture frame wire or something similar that you have on hand)
Anchored cup hooks into the walls to match the corners of my custom blankets
Hung the blankets on hooks
The hooks and anchors are the only part that was semi-permanent. If you’re not able to drill into the walls at your space, you could very likely get by with Command hooks.
Keeping Noise OUT: Gear Placement and Workflow
A universal rule for any home voiceover setup:
Keep anything noisy OUT of your booth.
For me, this was the elderly laptop (and my cheap analog watch). The fans on my old laptop were often humming, and they’re loud. It wasn’t worth rolling the dice and praying they don’t fire up in the middle of a session, so I built a lil satellite rig with what I had on hand:
Old, cracked iPad → became my mirrored display
Kid’s foam case for tabet → became the mount
Broken light stand →became the stand
Milk crates + a 2x8 → became my standing desk
It looked exactly like how it sounds. Feral.
Yet functionally perfect.
My Voiceover Gear Setup
Microphone
Rode NTG2
$280 new / $100-150 used
Supercardioid (aka very directional), mostly picks up what’s directly in front of it, not the rest of your house ;)
Audio Interface
Scarlett Solo v3
~$100 new (at the time) / $60 on eBay
Peripherals
High-quality XLR cable
Don’t cheap out on cabling. Resist the Amazon special here. Go name brand.
Low-quality cables degrade your signal chain and are an easy problem to throw a small amount of money at. Plus, if you know how to coil cables properly and not let your connectors smack on hard surfaces, a good-quality cable will last decades.
Over-Ear Headphones
I use the Audio-Technica ATH-M30x which I modded with a shorter cable a long time ago. But you can get away with most name-brand models in the $100 range. The Sony MDR7506 are the same price and are in every recording studio.
Over-ear; not on-ear.
Wired; not wireless.
Generic Desktop Mic Stand + Pop Filter
Amazon special is OK on these two; just make sure the stand has a heavy, solid base (not a tripod).
Software
Digital Audio Workstation (DAW) of your choice:
My workflow is a combo of Reaper and Adobe Audition.
Both of these are paid apps, and worth the money IMO.
There are free alternatives discussed at length on Reddit.
Audacity is one that’s mentioned often.
If you’re using a Mac, you can get by with Garageband as it comes with the OS.
Garageband should not be considered a true DAW but a way to get your feet wet and start recording asap
So… How Did This Home Recording Booth Sound?
Honestly? Surprisingly (and mercifully) good.
The treatments I made were unquestionably effective. Remember we’re not trying to “soundproof” here. We’re trying to acoustically treat an available space and accommodate a number of variables. For me at this stage it was space and budget since I didn’t have much of either but knew from researching that all this was possible.
With the moving blankets, foam panels, clothes hanging, and compact size, I got:
No echo
No boxy sound
Clean, warm recordings
Minimal reflections
I still picked up outdoor noise (busy city neighborhood, and I’m under a flight path for a major US airport), so night recording was the best solution for uninterrupted sessions. I could get by during the day but would have to stop and wait for big trucks or sirens or airplanes, etc.
Was all of it ideal? No.
Was the audio broadcast-quality? Yes.
Was it comfortable? Nope!
Due to the pitched ceiling, my height, and my preference to perform standing, I had to keep my head tilted quite often. It was also hot in there and closing the door was difficult with the mess of intertangled blankets on either side.
Would I Do It Again?
100%.
If I had similar space and budget restraints I’d honestly change very little:
If using a typical (non-pitched) ceiling, I might’ve created a ‘hammock’ from grommeted moving blankets to suspend from the ceiling and then place pillows or other blankets inside, to reduce the size of the open space and increase absorption.
If I were securing foam panels to blankets again, I’d probably use picture-hanging wire instead of my yarn-and-felt time-waster.
Maybe another layer of blanket on the exterior of the door, as that opening is your weakest link.
Should You Build a DIY Closet VO Booth?
Absolutely — especially if:
You’re on a tight budget
You can’t dedicate a whole room
You want better audio without major construction
You like getting your hands dirty
DIY projects stack knowledge fast. Every booth upgrade teaches you a ton of new stuff.
Final Thoughts
Time is a cost here.
Treat your time with respect and go into the project with a simple plan of at least some measurements, a crude drawing, and the rough order of steps. This keeps me honest with myself and moving forward, instead of waffling on decisions.
Perfectionism is procrastination in a tuxedo. Don’t obsess over small details. Get everything up and start recording.
If you have any questions about building a home voiceover recording setup, or want to share your DIY build, I’d love to chat with you in the comments.
Later!